
Context
Previous user research with the support team highlighted that the existing process for onboarding new providers created several challenges. Previously, new providers were sent a Microsoft form to complete; the provider would send this back to the support team via email and a support agent would then manually add the new provider to Publish. This approach was described as clunky, unsuitable and inefficient. It also left no in-product record or audit trail.
The Microsoft Form was also often linked to an individual support agent’s Microsoft account. When that account expired, the form link would stop working, causing delays and confusion, further underscoring the inefficiencies of the process.
User needs
After an initial session with a member of the support team, we identified two main needs to address in the MVP:
- Move the onboarding process into the Publish service and create a ‘GOV.UK style’ form that can be completed by new providers
- Ensure the support team can create, view and manage requests in the support console
What we did
We designed a new onboarding flow that lets the support team generate a provider form directly within Publish, send it to the provider, and track its status through to completion.
The new flow did not replace the existing ‘add a provider’ flow. The support team continue to manually create providers based on submitted details.
To keep the MVP small and deliverable, we made several design decisions:
- We created a new Onboarding tab in the primary navigation to make the flow easy to find and clearly separated from the existing provider flow.
- We reordered questions in the new ‘GOV.UK style’ provider form to match the ‘add a provider’ flow, making it easier for the support team to copy information across.
- The provider-facing form is a single page (instead of a multi-step form) to simplify the build.
- We did decide to add a ‘Check your answers’ step so providers can confirm details before submitting; this was especially important because the form becomes locked for providers after submission.
- We added ‘copy link’ functionality so support team members can easily share the generated provider form link with new providers. This link is hidden if JavaScript is disabled and can still be copied manually.
- We removed some aspects originally featured in the initial designs, including collecting a 'reason for rejection' step and change links on the provider details page to help balance user needs with the complexity of the build.
- We focused on integrating the new process into the support console, not on changing the legacy add-a-provider process which would have added a lot more complexity.
How the new onboarding form works
This section describes the end to-end flow introduced in the MVP.
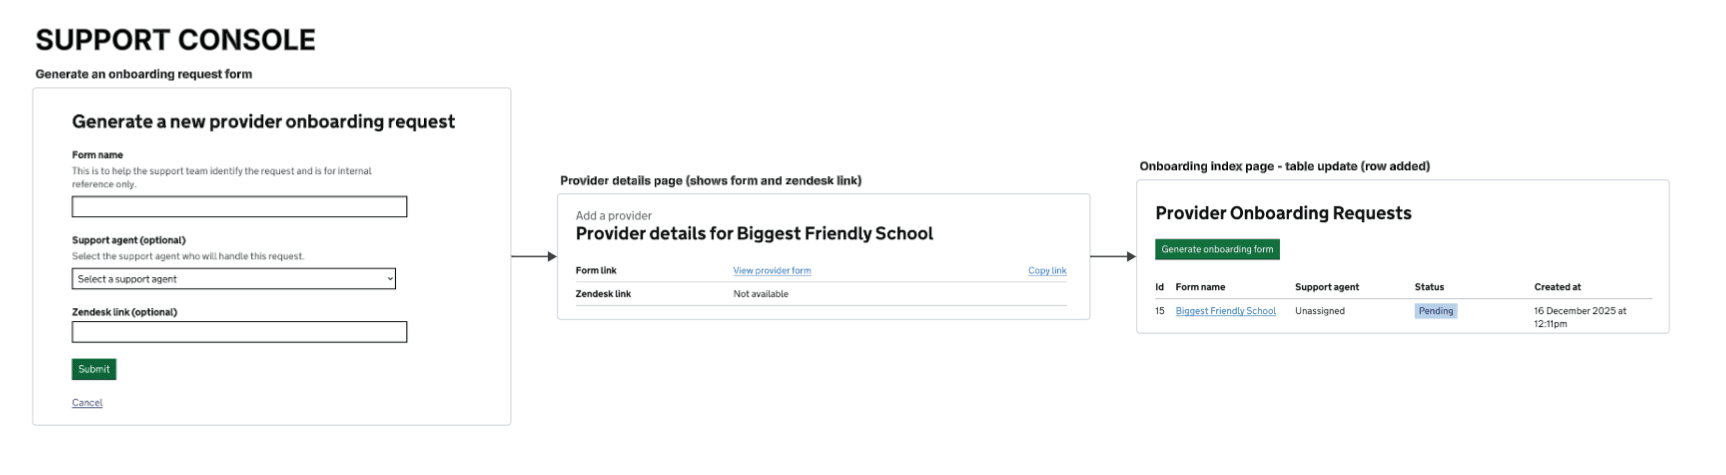
1. Support team generates an onboarding form
- Support team go to the Onboarding tab in the support console.
- Select Generate onboarding form and complete a short request form.
- After submitting, an onboarding form is created with a unique link to the provider-facing form (under the Publish namespace).
- The support team copies the link from the provider details page and sends it to the provider.
- A new row also appears in the onboarding table with the status Pending.
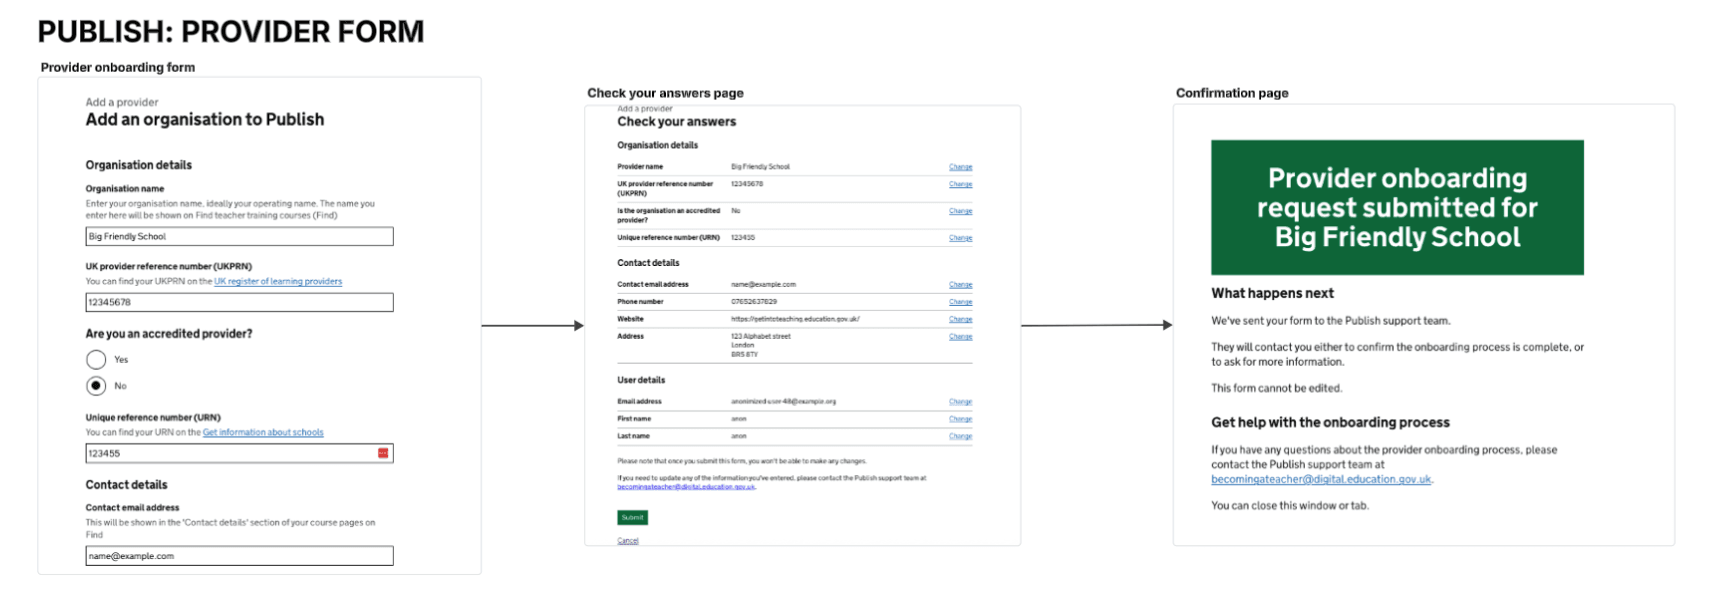
2. Provider completes their form
- Providers complete a single-page GOV.UK-style form.
- They review their answers on a Check your answers page and submit.
- After submitting, the form becomes locked and cannot be edited.
- If providers need to make changes afterwards, they are told to contact the support team. Admin users are always able to edit the form if needed.
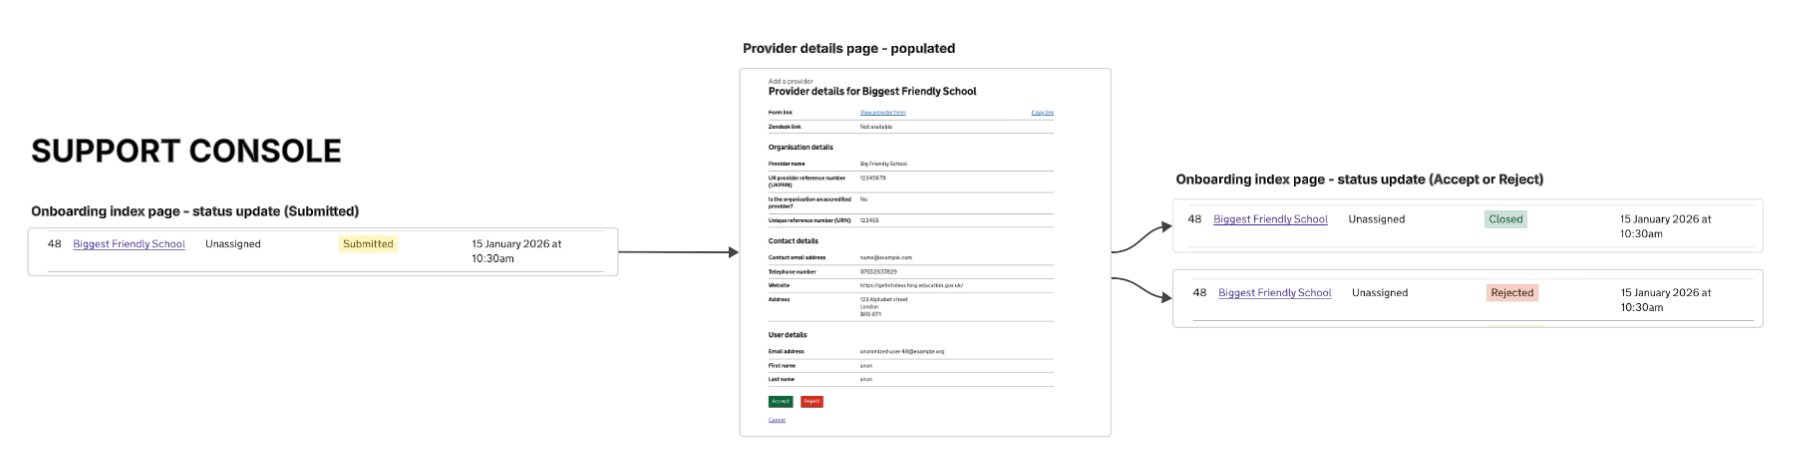
- The onboarding table in the support console updates to Submitted.
- For the MVP, no notifications are sent for status changes so the support team should check the onboarding table regularly.
3. Support team reviews and actions the request
- Support team open the submitted provider details from the onboarding table in the support console (identified by new yellow Submitted tag).
- They manually create the provider using the existing Add a provider flow in Publish.
- When the provider has been successfully added, the team can select Accept to close the request.
- If the provider should not be added, the support team select Reject.
- The onboarding table status updates to Closed or Rejected accordingly.
Next steps (future improvements)
There are several opportunities for future iterations:
- Add a step to collect a reason for rejection.
- Add notifications for support team users when request statuses change.
- Add an audit trail for onboarding actions.
- Refactor the current two-step form to use the new DfE wizard.
- Split the form into multiple steps (improving usability and accessibility).
- Integrate the onboarding flow with the ‘add a provider’ flow to remove the manual step entirely.